Chapter 10 Common questions
Below are some frequently asked questions. If you have a question that isn’t answered below, please bring it up with the rest of the team and we can add it to the page.
10.1 Systematic review guidance (how to do a manual search, etc.)
- The CAMARADES guide hosted by CAMARADES Berlin walks through all the steps of a systematic review.
- The SyRF help guide hosted on the SyRF website walks through all the steps of using the Systematic Review Facility (SyRF).
10.1.1 Importing outputs from SyRF to EndNote
If you want to import comma separated value (CSV) file outputs from bibliographic data from SyRF projects into EndNote (reference management software), you will need to manually change some of the column names and convert the file to a text tab delimited (TXT) file.
- Open your csv file in Excel and edit the following columns:
- Add a column to the left with column name
Reference Typeand for each row type ‘Journal Article’ - Rename
StudyIdtoNotes - Rename
AuthorstoAuthor - Rename
PublicationNametoSecondary Title - Delete
AlternateName(usually empty or duplicate of PublicationName) - Rename
UrltoURL - Rename
DoitoDOI - Rename
AuthorAddresstoAuthor Address - Delete
ReferenceType - Rename
PdfRelativePathtoResearch Notes - Rename
CustomIdtoAccession Number - Delete
TimeDateStudyAdded,SystematicSearchId, andSystematicSearchName - Keep
Title,Abstract,Year, andKeywordsas they are
- Save the file as
Text (Tab delimited) (*.txt) - Open the text file, and use find and replace to remove all quotation marks from the file (e.g. add ” to the find box and keep replace box empty)
- Save the text file
- Open your EndNote library and click
Import -> File - Choose your file, choose
Tab delimitedas your import option, and hit import
10.2 Using Jupyter notebook via CAMARADES Juniper
10.2.1 On Windows
Install on your home directory using the following command in MobaXTerm:
sudo pip install notebook If you need sudo access, contact Charis for
help.
Once installed: jupyter notebook --no-browser --port=8080 This will
produce a web link to allow you to access Jupyter notebooks. However,
you won’t be able to access it until you create an SSH tunnel between
your personal computer and Juniper.
To create the SSH tunnel, enter the following command into your computer
terminal (via PowerShell or similar)
ssh -L 8080:localhost:8080 username@address replacing the
username with your Juniper username and address with the Juniper address
You may have to accept a warning before continuing.
You should now be able to follow the link in MobaXterm to access Jupyter Notebooks.
10.2.2 On Mac
Setting up:
In the terminal:
- Log in with port forwarding: ssh -L 8080:localhost:8080 username@address
- Start a new Jupyter notebook server: jupyter notebook –no-browser –port=8080
- Copy the full http://localhost:8080/?token=… link it prints, and open it in your browser.
If need to create a new Python environment (virtualenv):
- Install virtualenv if not already installed: python3 -m pip install –user virtualenv
- Create new environment: python3 -m virtualenv ~/myenv
- Activate new environment: source ~/myenv/bin/activate
- Install Jupyter and packages inside it:
- pip install –upgrade pip
- pip install ipykernel jupyter pandas numpy matplotlib
- Register the environment as a Jupyter kernel: python -m ipykernel install –user –name=myenv –display-name “Python (myenv)”
- Deactivate when finished: deactivate
If URL has 8081 rather than 8080:
In the terminal
- Clean up all old Jupyter servers (if it is saying port 8080 is in use): pkill -9 -u $USER -f jupyter
10.3 Common linux commands
The CAMARADES Juniper computer runs on the linux operating system (rather than Windows or MacOS). When running code on Juniper, you’ll mainly be using RStudio, but you may have to run linux commands to move large amounts of files or revert GitHub commits. Below are some common linux commands which you can use in MobaXTerm or the terminal tab within RStudio.
10.3.1 Create a new user profile
A sudouser may have to perform this action. Replace “newperson” with the desired username.
If user requires a home directory, e.g. requires RStudio access, create user using:
sudo useradd -m newperson
If not, create the user using:
sudo useradd newperson
Then ceate a password:
sudo passwd newperson
10.3.2 List files in a directory
ls will list files in your current directory ls -R will list all
files in your current directory, and all files in subdirectories
10.3.3 Change directory
Use cd [directory] to change the directory you are in. For example,
cd /home/user/project.
10.3.4 Move files or folders
Use mv [curent directory] [new directory] to move files and folders.
For example mv /home/user/full_texts /home/user/projects/soles will
move full_texts and its contents to
home/user/projects/soles/full_texts
10.3.5 Copy files from Juniper to local directory
The scp -r option is used to recursively copy entire directories
including all subdirectories and files from the specified source to the
destination.
scp -r username@remote-host:/path/to/remote/directory ~/path/to/local/directory
For example
scp -r user@416.76.34.64:/media/soles/soles-project-pdfs/full_texts ~/Documents/soles-project-pdfs
will take all of the files inside Juniper’s
soles-project-pdfs/full_texts folder and copy them to the local
soles-projects-pdfs folder.
10.3.6 Set up a symbolic link
To set up a symbolic link between an existing folder within a RStudio
project and a folder within a larger storage space, use the following
command:
ln -s [path_to_larger_storage_folder] [path_to_folder_in_project] For
example,
ln -s /media/soles/sprint-soles-pdfs/full_texts /home/user/sprint-soles
will create a link to the ‘full_texts’ folder in ’sprint-soles`.
10.3.7 Reverting GitHub changes
If you need to unstage files (before you commit) you can use
git reset. This is useful if you accentally try to stage a large
folder like full_texts. If you have already committed and want to
revert your last commit (for instance, if you committed changes to the
wrong branch) you can use git reset --soft HEAD^.
10.5 Creating SOLES databases
We use Amazon Web Services Relational Database Service for SOLES databases. Once you have the log in details, this is how to create a typical Postgres SQL database for SOLES.
Step 1: Naviagate to Relational Database Service and navigate to Create Database
Step 2: When in the creation page, select standard create and PostgresSQL

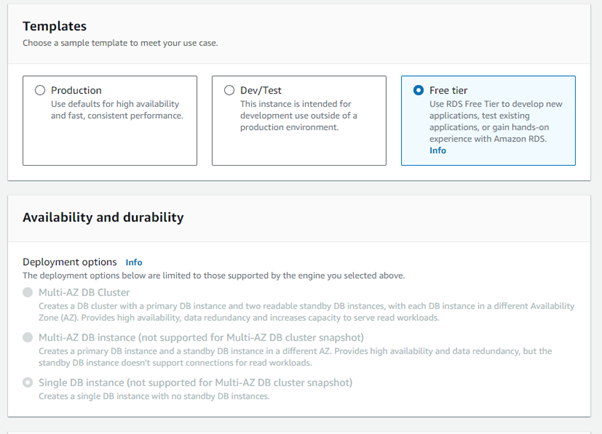
Step 3: Select the free tier option (for now, can be upgraded later)
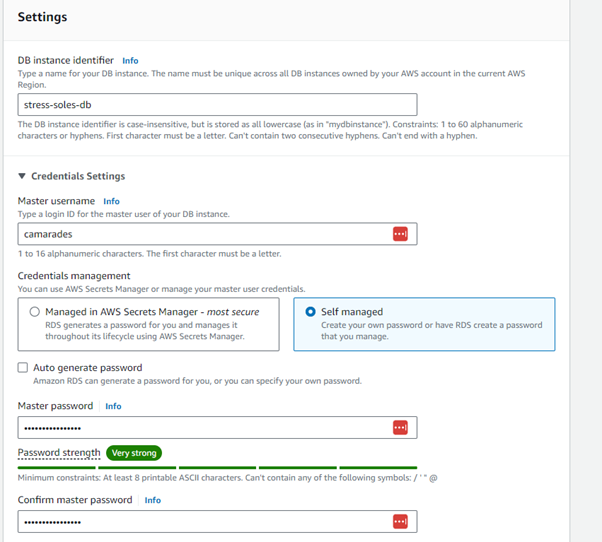
Step 4: Name your database in the DB instance identifier. We tend to go with nameofdisease-soles-db
Step 5: Enter the master username as camarades and select “self managed” for credentials management. Add a strong password (write this down!)
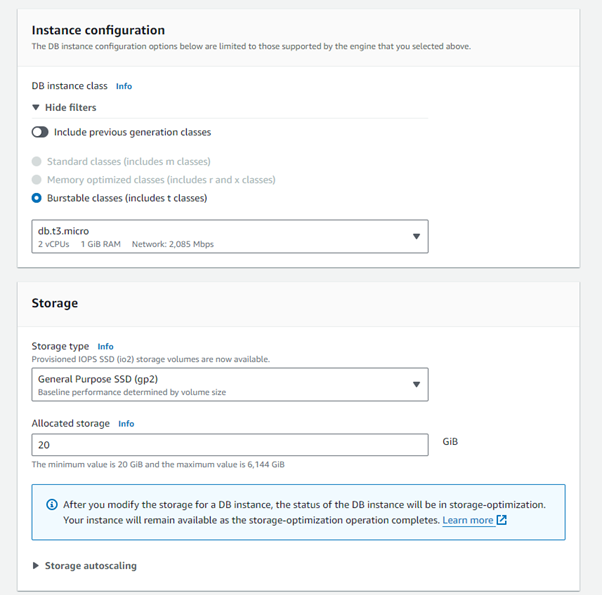
Step 6: Scroll down, you can leave all of these as default.
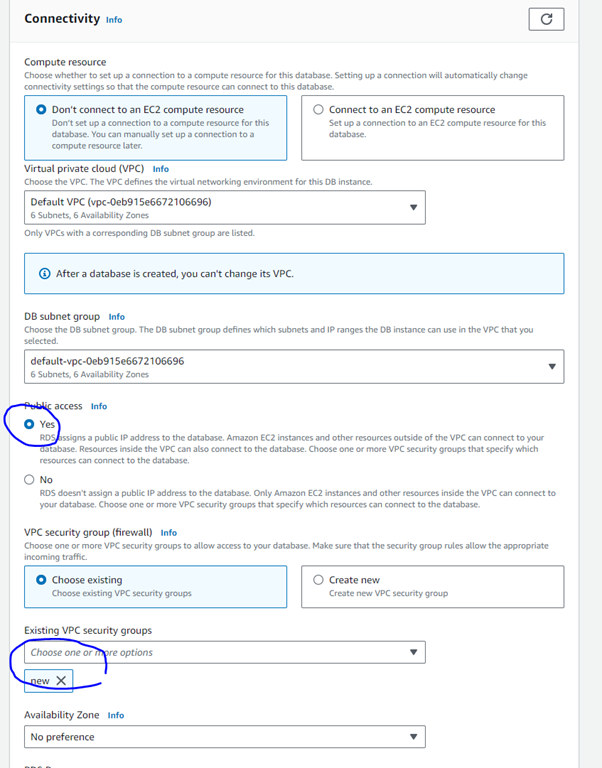
Step 7: You can leave most of these options as default but select Public access - yes and change the security group to “new”. This will allow juniper to access this database.
Step 8: Complete this form and your database will be created! Details for connections will be available in AWS when you navigate to the database name. The screenshot below indicates the database details. Note the endpoint and the port - these are needed for connecting to the database via R.
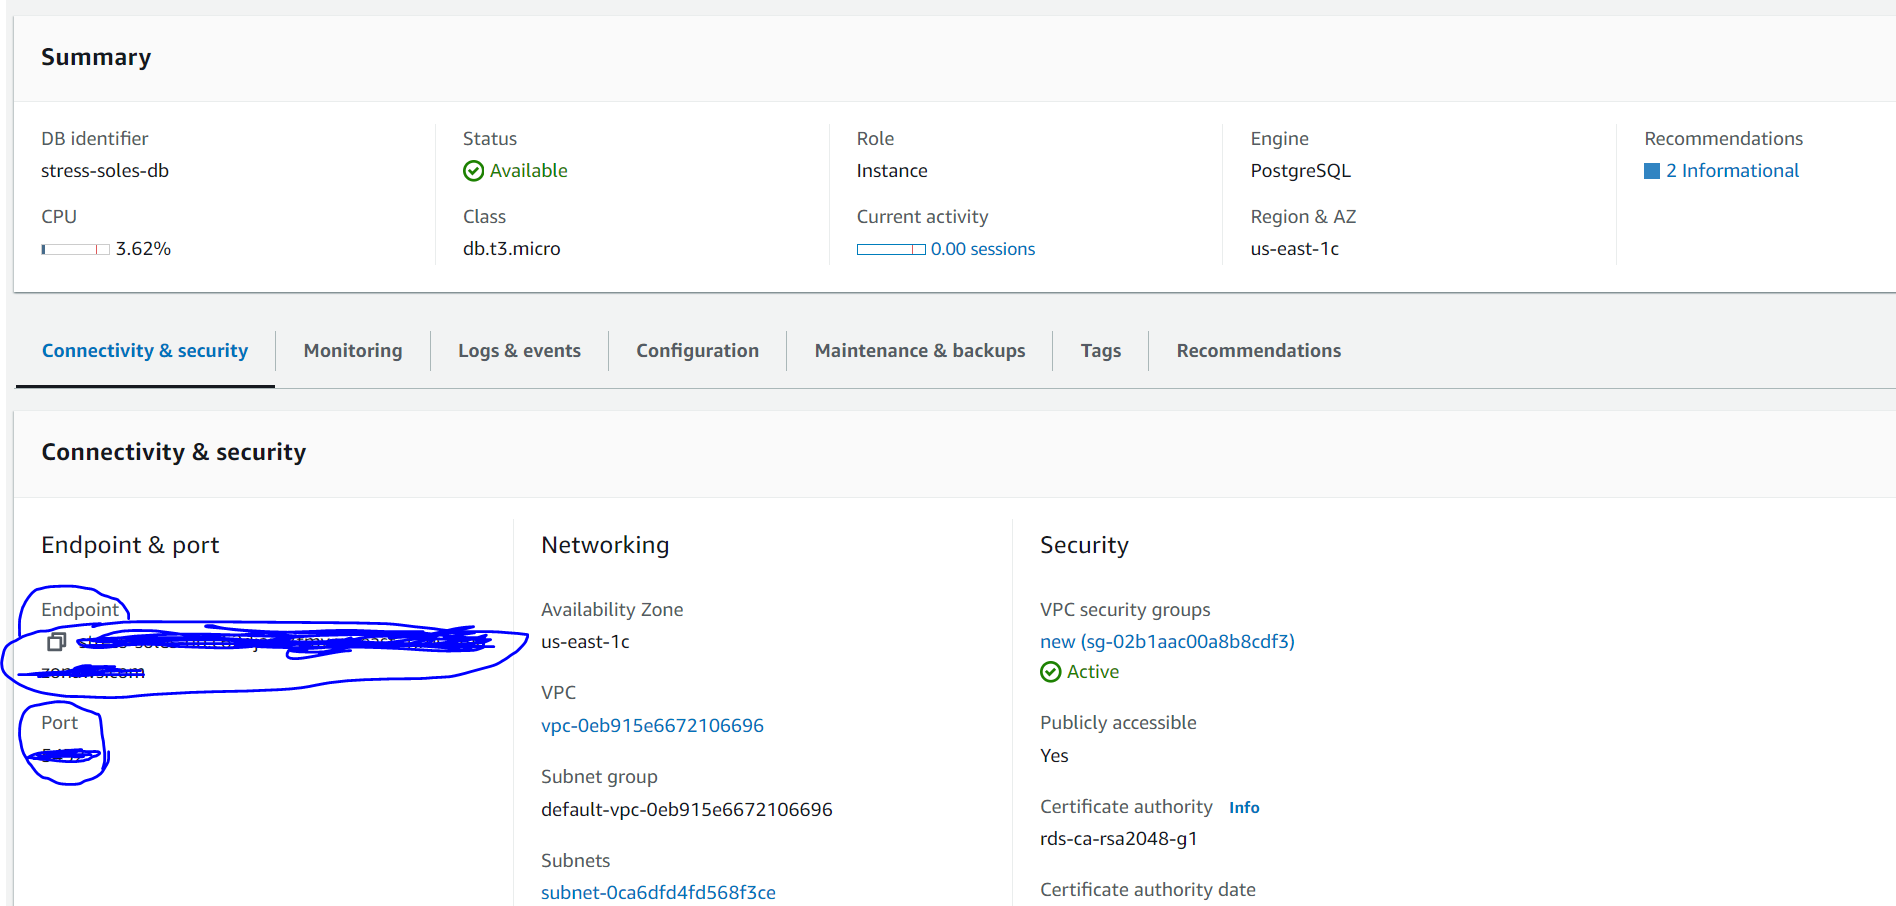
Step 9: To connect to the database in R, it is best practice first save the endpoint (as shown above), DB identifier (name you gave the soles db, in the format xxxx-soles-db), port, user (note this should be camarades), and password (user defined from earlier) in your R.environ file. Then you can bring these in using Sys.getenv(). Using the dbConnect() function from the DBI package, you can then connect to the database. Here, dbname = name of the SOLES database and host = endpoint. Example code below.
10.6 Editing the SOLES Projects webpage
Written by Emma Wilson, 6th October 2025
Want to edit the SOLES Projects webpage? Here’s how.
Everything you need is in the GitHub repo. Yuo can edit the repo directly, and do not need to fork or push to your local computer.
10.6.1 Adding a new SOLES project
- Navigate to “img” and then “portfolio” in the GitHub repository, and add an image for your SOLES project.
- Navigate to the “_posts” folder and create a new markdown file called “YYYY-MM-DD-[name of soles].markdown”.
- The date you put in the title doesn’t necessarily matter but will determine the order of projects on the webpage – more recent dates will display first.
Why? It’s because this website template uses a blogpost format so more recent “posts” will appear first. I think you can also use modal_id in the markdown files but I’ve not tested this.
Paste the following into the markdown file and edit only the commented lines (including the ---):
---
layout: default
modal-id: 1
date: YYYY-MM-DD # this should be same as post title date
img: my_soles.jpg # the name of your SOLES image added earlier (replace with your own SOLES name)
alt: my SOLES logo # alternative text for your logo (replace with name of your SOLES)
link: https://camarades.shinyapps.io/my-soles/ # link to your SOLES app
contact: name [at] domain # corresponding author email address
cite: citation # citation for your SOLES project
description: description # the description for your SOLES project
---
You should be good to go! Committ and your changes should be made shortly.
10.6.2 Removing a SOLES project
Remove the image file from the “img” / “portfolio” folder and remove the markdown file from the “_posts” folder.
10.6.3 Editing the site content
The site content can be edited in the “_config.yml” YAML file and files in the “_includes” folder (e.g. about.html). Editing text in these files is easy enough but I recommend asking someone familiar with web dev / HTML / CSS before editing the site structure. In the YAML file only edit content after a semi-colon, do not edit anything else or you will break the site.
10.7 Editing the cookbook
This site is built using R Bookdown which means you can copy into R and edit locally before pushing changes to the live site, but you can also edit directly in the GitHub repo.
All pages are written in Markdown. Most of the pages are numbered in the GitHub repo, but the homepage is named index.Rmd. If you want to add images, add them to the images folder and link using normal Mardown syntax.